2011
11.30

Moving Wiki pages to Weblog

This notice is just to inform everyone that I am in the process of moving all my wiki pages to my weblog. Since DAZ’s wiki is currently down, I figured it would be good to have em up somewhere that people can access if need be. I also figured it was a good place as any to back them up.

To my Weblog subscribers: My apologies to you guys, as a couple were accidentally emailed to you in error. No more will be sent via email (since I don’t consider these to be important news)

And since my blog is ALSO syndicated to Facebook-Twitter-Myspace, apologies if these accidentally sneak into those places as well LOL I am trying to remove them as they are posted, but I am sure some people are seeing them before I get them removed.

2011
11.30

Chaotic Realms

Release Date: January 2010
Store Product Page: Chaotic Realms
_______________________________________________________


Step into Realms long forgotten, where dragons swept through skies, and mermaids swam in seas
into times long passed, when great Pharaohs ruled Egypt, and Greek Gods reigned supreme
Travel to Desert Wastelands, Jungle Hideaways, Tropical Paradises, Snowy Landscapes and more!

Chaotic Realms is a massive set containing 40 backgrounds, which feature MANY different environments. Fantasy, Funerary, Science Fiction, Historical – Whatever flavor you fancy, there’s bound to be a perfect one for you

Also included are 40 Lights for Poser, which match each background according to color and light source. All of the lights have Ambient Occlusion and soft shadows enabled, for a touch of realism.
The matching lights for the backgrounds that feature water, also have gels applied to create caustics

===== LIST OF CONTENTS: =====

Apocalyptic Sun (2000×1500)
At The Forest’s Edge (1500×2000)
Athenian Temple (1500×2000)
Badlands (1500×1937)
Bordering on Insanity (2000×1500)
Castle Doom (1098×1464)
Castle in the Clouds (1500×2000)
Crystal Castle (1200×1600)
Crystalline (1500×2000)
Dark Apocalypse (1500×1937)
Desert of the Scorpion (1500×1937)
Dragon’s Conquest (2000×1500)
Fallout (2000×1500)
Forgotten Island (1000×1500)
Frayed Ends Of Sanity (1200×1600)
Garden Of Hesperides (1500×2000)
Haunted (1000×1500)
Hell’s Gate (2000×1500)
House of the Dead (2000×1250)
Jungle Hideaway (2000×1500)
Jungle Ruins (1200×1550)
Last Snow (1600×1200)
London Fog (2000×1500)
Lothlorien (1600×1200)
Mist of Xarthania (1600×1200)
Moon over the Glades (1500×1200)
Mount Olympus (1500×2000)
Oasis Mirage (1600×1200)
Paradise Lost (1600×1200)
Peruvian Gold (1600×1200)
Phantoms (2000×1500)
Proof Of Existence (2000×1500)
Red Sun (1500×1937)
Saturn Returns (1600×1200)
Sunken Ruins (1600×1000)
Temple of the Sun (1600×1000)
The Bone Throne (1498×1936)
The Clock Tower (1098×1465)
The Cursed (2000×1500)
Wasteland (2000×1500)

40 Matching Lights for Poser
Ambient Occlusion and Soft Shadows Enabled
6 Lights have gels applied to create Caustics

===== INSTRUCTIONS: =====

..:: BACKGROUNDS ::..
All thats needed to use the backgrounds is a program that reads JPG such as Photoshop or Paintshop Pro. You can also easily import them directly into Poser (or DS)

..:: LIGHTS ::..
There are 40 lights included, each which match the backgrounds included. These are labelled the same as the backgrounds are labelled, so you know which light to use to match (they also are thumbed with the matching background)

The lights have Ambient Occlusion and soft shadows, so in order to have your scene render correctly, you must enable shadows and raytracing in your render setings in Poser. Its also important to note that having these enabled will increase your render time some.

5 of the lights are for the backgrounds which have water in them – and these 5 lights have gels applied, to create caustics from the water reflecting on the objects in your scene. Should you wish to turn off the caustics, the light which contains the gel map is conveniently named “Caustics” – simply select that light in the scene and delete it, by clicking the trash can icon where the lights reside in Poser. You can also change the scale of the caustics, by clicking the caustic light and then the material room, and adjusting the scale on the image map to a higher number (U_scale and V_scale)

The lights that feature caustics are: Forgotten Island, Moon Over the Glades, Oasis Mirage, Peruvian Gold, and Sunken Ruins.

===== OTHER NOTES: =====
The Lights render decent in DS as is, despite the fact they were made in Poser. The intensity will not even need to be changed. However, the AO and soft shadows will not translate over (nor will the gels that are applied)

The backgrounds are rendered in Vue 6, and as such, the shadows in Poser will never perfectly match, since these 2 programs handle shadows very differently. If you find the shadow is too dark for your liking, you can adjust the shadow intensity on the light to a lower number (you can find “Shadow” on the parameter dials for the light) But be sure to only do so on the light(s) in the light set that have shadows enabled. You can also change the shadow blur to a lower number than 16.0 to make the shadows more sharp (also on the parameter dials, in the second tab) I opted to keep them as they are for the sole purpose of versatility, so theyd work nicely for other things aside from the backgrounds.

The thumbnails for the files are the standard 91X91 resolution. If you are a poser 5 or higher user and prefer the larger thumbnails (which are 125×125 in size), you can download them here: Chaotic Realms Thumbs

Please Note:
Bigger thumbnails will NOT work in DAZ Studio, nor lower versions of Poser, so only download these if your using Poser 5 and higher.

Instructions to install larger thumbnails:
These are set up to the same exact locations as the original sets thumbnails. To install, simply unzip it to your Poser Runtime, and overwrite the old thumbnails. If you have moved your folders around, you will have to move these manually, too.

Technical Support is always available. If you have questions that need answers, feel free to email me — IgnisSerpentus@damageinc3d.net

2011
11.30

Hexxus: The Sword of Chaos

Release Date: March 2011
Store Product Page: Hexxus
_______________________________________________________


The legend of Hexxus tells the story a sword…. but not just any sword….

A sorceress, whom lived many ages ago, stole the secrets of magic from the most powerful civilations known to man, and hid the magic in a sword. The result was that the sword had the power to project multiple powers:

From the Elvish god of the woodland, Rillifane, came Earth; from Greek God, Aeolus, came Wind; from the Aztecan Xiucoatl came Fire; and from the Lord of lost city of Atlantis, Ampheres, came Water. But having the 4 elements was simply not enough, and she did not stop there. She stole lightning from the mighty hammer of Thor, and Ice from the Hindu God, Shiva. Finally, she was able to steal one more…. but this one was unlike the others, and the cost was her life. The final power, was the power of darkness from the Egyptian God of Chaos, Apep… and this is where the sword took a terrible turn from good, to evil.

With these powers combined, the mortal who holds Hexxus would be virtually unstoppable; he alone, could defeat the strongest of armies in existence and rule the world. But Hexxus is too powerful… and in the wrong hands, it will bring ultimate chaos.

Do you have what it takes to wield this blade?

===== LIST OF CONTENTS: =====

Hexxus Sword Prop
Left hand parent for V4
Left hand parent for M4
Right hand parent for V4
Right hand parent for M4

7 Elemental MATS that glow in the Dark
Xiucoatl’s Fire
Aeolus’ Wind
Rillifane’s Earth
Ampheres’ Water
Thor’s Lightning
Shiva’s Ice
Apep’s Chaos

Morphs on Sword
FX – Widen Top
FX – Mid Wider
FX – Widen Top
FX – Tip Thin-Wide
FX – Elongate
FX – Sphereize
FX – Warp
FX – Bubble
FX – Bubble 2
FX – WaveFront
FX – Wave Sides
FX – Wave Sides 2
Curve Blade (Curves blade and FX)

Poses Included, which work with the Left Hand Sword
10 Poses for V4
10 Poses for M4

===== INSTRUCTIONS: =====

..:: Using Hexxus ::..
To locate the prop files, you will need to browse into Runtime:Props:Hexxus. Here you will find Right and Left hand parents for both M4 and V4. Load either M4 or V4 into your scene, then click on the prop icon to load, and they will parent to the figure.

To use the Elemental mats that are included, you need to browse to either Poses:Hexxus:Elements or Materials:Hexxus libraries in Poser. Ive included both, since PZ2’s tend to be rather temperamental when used on props. This is especially the case if you have more than one sword loaded in a scene. So if you’re going to have more than one sword loaded in a scene, use the MC6 files to load the mats instead. For DS, you will only need to browse to the pose library. Note, that you will need to apply the materials if you’re using DS, so the glow effect will take (since the default mat on the prop itself, won’t carry over properly from Poser)

There are also a few morphs on the blade, just to kind of sweeten the special effects. You can make the top of the special FX layer wider and longer (the latter, which is esp cool for animating) Theres also a blade curve morph… this will just make the blade have a different shape. Keep in mind, the elongate morph does not work well with the curve morph – while it can be used, it does not match correctly.

..:: Using The Poses ::..
Ive also included poses for both M4 and V4, which work with the sword. Be sure to load the sword first, and then use the pose, so the sword will pose correctly with the figure. Also note, you must only use the Left hand parents for V4 and M4 on these poses, as they were designed for it specifically. If you use the right hand, the sword will not place properly on the pose.

===== OTHER NOTES: =====
Includes DS optimized mats, PZ2 & MC6 Mats for Poser

Color coded and labeled templates for all figures and props are available, so you can make your own textures and Special FX.

The thumbnails for the files are the standard 91X91 resolution, so that they will show properly in DAZ Studio. If you are a poser 5 or higher user and prefer the larger thumbnails (which are 125×125 in size), you can download them here: Hexxus Thumbs

Please Note:
Bigger thumbnails will NOT work in DAZ Studio, nor lower versions of Poser, so only download these if your using Poser 5 and higher.

Instructions to install larger thumbnails:
These are set up to the same exact locations as the original sets thumbnails. To install, simply unzip it to your Poser Runtime, and overwrite the old thumbnails. If you have moved your folders around, you will have to move these manually, too.

KNOWN ISSUES
There are no known issues beyond what you’d encounter normally

Technical Support is always available. If you have questions that need answers, feel free to email me — IgnisSerpentus@damageinc3d.net

2011
11.30

Artik X

Release Date: April 2011
Store Product Page: Artik X
_______________________________________________________


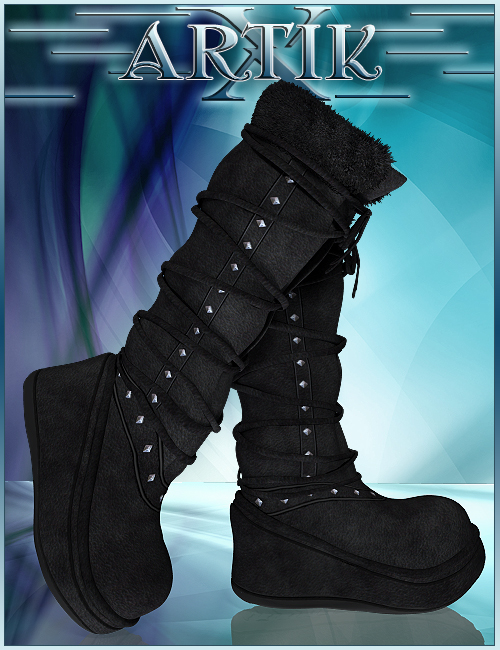
Where is Victoria going today? Will it be the Frozen Tundra or out to the local mall? Wherever she goes, she needs the perfect boots to accessorize with! And ones that are comfy on her poor feet, besides.

Artik X Boots are the best of both worlds. These versatile, yet trendy boots were designed to withstand sub-zero temperatures. With padded soles and a 3″ shock-absorbing wedge, they’re also uber comfortable to wear for hours! But what good is comfort and durability, without appeal? Sporting a flirty lace-up closure with ties in the front, they are sure to be the perfect addition to Victoria’s closet.

===== LIST OF CONTENTS: =====

Artik X Boots
Superconforming
Non-Superconforming

MATS For Boots
Hyena
Leopard
Ocelot
Tiger
White Cheetah
Black Biker
Brown Aviator
Purple Celtic
Red Flamez
Teal Tribal

V4 Poses Included
Partial Pose which drops V4 to the floor

===== MORPH LIST: =====

Amazon
Fitness
Thin
Voluptuous
Fantasia
Sylph
Utopian
Stephanie
Caitlyn
Isabelle
Grace
Cuffs Out
Cuffs Front Out
Cuffs Inner Side Out
Cuffs Outer Side Out
Shins Thickness
Shins Outer Side Out
Shins Inner Side Out
Shins Front Out
Shins Back Out
Ankles Back Out
Ankles Front Out
Ankles Inner Side Out
Ankles Outer Side Out
L & R Cuff Out
L & R Cuff Front Out
L & R Cuff Inner Side Out
L & R Cuff Outer Side Out
L & R Shin Thickness
L & R Shin Outer Side Out
L & R Shin Inner Side Out
L & R Shin Front Out
L & R Shin Back Out
L & R Ankle Back Out
L & R Ankle Front Out
L & R Ankle Inner Side Out
L & R Ankle Outer Side Out
Boots Short
Wedge Style

===== INSTRUCTIONS: =====

..:: LOADING THE BOOTS ::..
To locate the figures, you need to go to your figure library and find the Artik X folder. To conform the boots, load the item, go to the top of poser under the drop down menus and click on Figure. A new menu will open which will say conform, click that and then conform to and a new dialog will open with its own dropdown. Select Victoria 4 and hit ok, and the item will load onto V4 (alternatively in DS, right click on the item and click “fit to” then select V4 in the list – but it should auto-conform in DS anyway) From there, you have a ton of morphs to play with, including adjustments which will fix pokethru, and a couple style morphs, which will change how the boots look (note: dialing in morphs ALWAYS work best by dialing in on the BODY actor)

You will also notice there are 2 versions of the boots – normal ones that you will have to dial in manually, and Super conforming versions that will automatically match whatever morphs you have dialed into V4. Keep in mind, to avoid pokethru, it is best to use the Magnetize clothing to V4 poses, which are included with V4 when you purchase her. The clothing has a myriad of standard DAZ morphs and adjustment morphs, so you can fit it to your own characters.

Also, Ive tossed in 10 mats to change up the boots, which range from Leather to Furs. The furs have displacement, to create the fur effect, so displacement must be enabled in your render settings in Poser. All the boots require displacement to be enabled, since the wedge of the sole has tread. The mats are located in the Pose library, in the folder Artik X. The DS Mats included run off the runtime, so it is to the Runtime which they will install.

..:: POSES ::..
Ive included a pose for V4 in the set. This is actually a partial pose, and will only move her hip and feet. The pose has been included, because the wedge is very thick, and this will make it so that V4 will drop to the floor properly. If you’re using other poses in the set, its best to apply that pose first, then the partial pose (but keep in mind, it will change the feet and shin rotations, as well as the hip trans)

===== OTHER NOTES: =====
DS Optimized mats are included

Color coded and labeled templates for all figures and props are available, so you can make your own textures.

All conformers have blank channels (DAZ standardly named PBMCC and PBMDC), so you can make your own custom morphs and inject them simplistically.

The thumbnails for the files are the standard 91X91 resolution, so that they will show properly in DAZ Studio. If you are a poser 5 or higher user and prefer the larger thumbnails (which are 125×125 in size), you can download them here: Artik X Thumbs

Please Note:
Bigger thumbnails will NOT work in DAZ Studio, nor lower versions of Poser, so only download these if your using Poser 5 and higher.

Instructions to install larger thumbnails:
These are set up to the same exact locations as the original sets thumbnails. To install, simply unzip it to your Poser Runtime, and overwrite the old thumbnails. If you have moved your folders around, you will have to move these manually, too.

KNOWN ISSUES
As covered in the instruction section, when using the conforming clothing in Poser, you may need to use the Magnetize clothing to V4 poses (which come with V4) so that absolutely no poke thru will occur.

There are no other known issues. Should you encounter one, feel free to email me (email is below)

Technical Support is always available. If you have questions that need answers, shoot me a line — IgnisSerpentus@damageinc3d.net

2011
11.30

Terrors Of The Deep: Jellyfish

Release Date: July 2011
Store Product Page: Jellyfish
_______________________________________________________


Fascinating and terrifying, the Jellyfish is a wonder of the deep. Armed with venomous tentacles, its a organism you definitely don’t want to tangle with. But as dangerous as they can be, they are equally as mystifying and beautiful, making the Jellyfish a perfect addition for all your underwater scenes!

Oral Arms are rigged with Easy Pose, so posing is a breeze! Also includes 42 morphs to change its hood, tentacles and further add to its swimming movements. Finally, included are 10 mats to change its species, and even make it glow in the dark!

This is the second in a series of dangerous creatures of the ocean. Others in this series are:
Portugese Manowar

===== LIST OF CONTENTS: =====

Jellyfish (CR2) located in Runtime:Character:Jellyfish
Oral Arms are rigged with Easy Pose\
41 Style and Movement Morphs
IK Enabled
Blank Channels for Pose INJ support

10 Species MATS (.PZ2 and .DS) located in Runtime:Pose:Jellyfish
Sea Nettle Jellyfish
Pelagia Noctiluca Jellyfish
Compass Jellyfish
Blue Spotted Jellyfish
Rampley Jellyfish
Blue Glow in the dark
Green Glow in the dark
Violet Glow in the dark
Red in the dark
Orange Glow in the dark

===== MORPH LIST: =====

Hood Style 1
Hood Style 2
Hood Style 3
Hood Style 4
Hood Style 5
Oral Arms Thickness
Oral Arms Long
Oral Arms Short
Tentacles Length
Tentacles Thick-Thin
Tentacles Spiky
Tentacles 1
Tentacles 2
Tentacles 3
Tentacles 4
Tentacles 5
Tentacles 6
Tentacles 7
Tentacles 8
Tentacles 9
Tentacles 10
Swim Upward
Movement 1
Movement 2
Movement 3
Movement 4
Movement 5
Movement 6
Movement 7
Movement 8
Movement 9
Movement 10
Movement 11
Movement 12
Movement 13
Movement 14
Movement 15
Movement 16
Movement 17
Movement 18
Movement 19
Movement 20

===== POSER INSTRUCTIONS: =====

..:: USING THE CONTENTS ::..
To locate the Jellyfish figure, browse to your Character library and find the folder titled Jellyfish. Here you will see the CR2 – double-click to load it. If you’re using DAZ Studio, you will find him in the same location in your DAZ directory.

To use the Jellyfish, there are quite a few tricks. Firstly, the Oral Arms (tail looking thing in the center of the jellyfish) is rigged with Easy Pose. You will find the node to control the chain on the “Jellyfish” actor. You can bend it fwd-back, side-side as well as twist it up as you wish (using the Easy Pose or just the rotations on each segment in the Oral Arms chain) IK has also been setup on the figure (it is turned off by default) – all you need to do is grab “Arm10” while IK is enabled and pull it about the scene, and the IK chain will follow. This will ensure proper angling for swimming. Also, posing the rotations by “Arm1” will allow for more realistic bending of the Jellyfish’s body – but note, you must have IK turned off for this. You also need to have the IK turned off for using the Easy Pose dials.

As the many tentacles that dangle from his hood do not individually pose, to further extend his movement capability, Ive added a metric ton of morphs to him. Hes got 21 movement morphs alone, which will make him (his entire body) swim. He also has style morphs besides, to change how he looks. There are 5 hood morphs, 3 morphs to change the style of his oral arms, Tentacle morphs that change the length, thickness and make the tentacles spiky and 10 tentacle morphs (which are basically formations and movements that mimic them floating about in the water) Keep in mind, you can use combinations of morphs to further extend his capability, but use with caution, as they weren’t designed to work together. So you might find some of the combinations have unsatisfactory results. Please note: To use the morphs, you must dial in the FBM’s located on the BODY actor. These will control the morph over the entire figure – if you dial them in partially only using the other bodyparts instead, detatchment of the model parts can occur.

As a last note, Limits have been forced on the morphs to avoid turning them too high (as well locked negatively on some, as they don’t work well in the negative) but they are only locked on the FBM dials. Limits, however, have not been forced on the rotations, so pose with caution to avoid overextension.

There are 10 textures included as well, which will change his species. You will find these in the Pose Library, in the Jellyfish folder. The first 5 are patterned styles, with prominent markings on them. The last 5 are all see-thru, glow in the dark. If you turn the lights off while using any of these last 5, he will actually glow in the dark to mimic bio-luminescence. To load these, you simply browse to your Pose library into the Jellyfish folder. Included are PZ2 mat poses as well as DS optimized mats.

For more, please refer to the end of the wiki page, under “Known Issues” to see how to deal with certain issues.

===== TIPS AND TRICKS: =====

How to change the glow color in Poser & DS:
If you’d like a different color on the glow in the dark mats than what’s been provided, changing it is easy! In Poser, you only need to change the translucence color (and specular color as well, if the color is matched) to whatever color you wish. In DS, its the Ambient color you want to change (again, along with the specular color if its matched) Also, where the specular color is matched, you can opt to change the spec to white instead, and make it shinier. This, however, will wash out the color, so I opted to leave certain ones matched.

Getting the gradient rainbow effect:
The Promo above shows a colorized rainbow effect – and getting this effect is also simple, but will require some very light postworking in Photoshop. Simply render the jellyfish (with a glow mat loaded) and export it as a png – this will make the background of the image transparent. Then, add the png to your desired background in Photoshop. On the Jellyfish layer, you’re going to right click on it, and choose “Blending Options” in the menu that appears once you right click. From there, you will go to gradient overlay and check off the box next to it. A default black to white gradient will load, which you can then edit to your desired color scheme (or you can alternately choose from the gradients in the preset library, if you prefer) Set the blend mode to “color” and voila! A rainbow jelly!

===== OTHER NOTES: =====
Color coded and labeled templates for all figures and props are available, so you can make your own textures.

All figures have blank injection channels for custom morph support

The thumbnails for the pose and light files are the standard 91X91 resolution, so that they will show properly in DAZ Studio. If you are a poser 5 or higher user and prefer the larger thumbnails (which are 125×125 in size), you can download them here: Jellyfish Thumbs

Please Note:
Bigger thumbnails will NOT work in DAZ Studio, nor lower versions of Poser, so only download these if your using Poser 5 and higher.

Instructions to install larger thumbnails:
These are set up to the same exact locations as the original sets thumbnails. To install, simply unzip it to your Poser Runtime, and overwrite the old thumbnails.

===== KNOWN ISSUES: =====
Note that you must use the FBM’s located on the BODY actor, to dial in the morphs. If you use them on the bodyparts instead, you will find some detatch from the parts of the figure.

I recommend against using the Oral Arms Length Morph and posing the Oral Arms at the same time – because the length of the morph, it moves the joints off their intended placement, and therefore messes up the posing. If you’re using that morph, I suggest using one of the many movement morphs with it instead.

IK must be turned off when using the Easy Pose functionality. For best results, I recommend initally posing his angle with the IK on, then turning it off again to pose his Oral Arms and/or dial in the movement morphs.

Technical Support is always available. If you have questions that need answers, feel free to email me — IgnisSerpentus@damageinc3d.net

2011
11.30

Dark Apocalypse: Prisoner of War

Release Date: November 2011
Store Product Page: Prisoner Of War
_______________________________________________________

_______________________________________________________
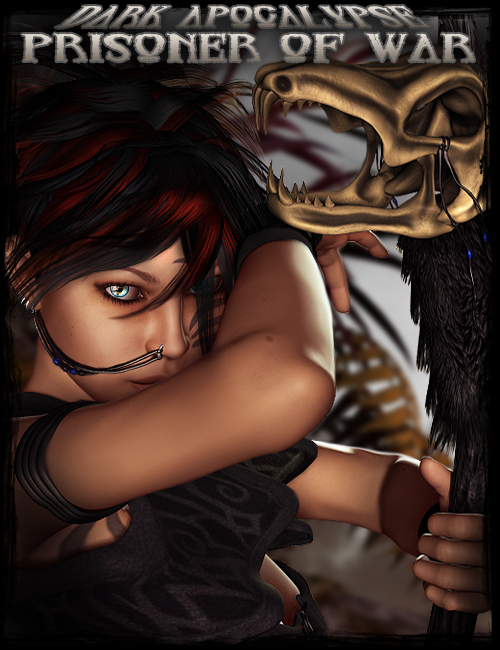

Separated from her family and left to wander the desert as a nomad,
Ki’ara is a young innocent, who has been toughened by the Apocalypse.
Falling into rough crowds and thieving has been a means of survival for this fiesty gal

Until one day her luck runs out, when she is captured by the Sarotu and taken as a Prisoner of War.

She is left alive, but at the cost of doing the bidding of their leader….
But Ki’ara, being the spitfire she is, does something to rebel against the very notion
And the Sarotu don’t take kindly to insolence…..

===== LIST OF CONTENTS: =====

Ki’ara Character
1 Fully Custom Head INJ/REM
1 Fully Custom Body INJ/REM
1 Natural Skin MAT
1 Tattooed Skin MAT
10 Makeup Options (Natural and With Tattoo)
6 Eye Options
2 Eye Reflects, Off Option as well as Tears off and on

Desert Captive Conforming Clothing
Bodice
Panty
Arms
Legs
Sandals
Slave Chain

Desert Punk Hair
Adjustment, Style and Movement Morphs

MATS For Figures & Props
3 Full sets for Clothing & Lynx Staff Prop
Utility MATS for clothing
14 MATS for Hair
DS MATS and Poser MATS Included

Props Included
Morphing Lynx Skull
Morphing Lynx Skull Staff (left and right hand parents)

V4 Poses Included
10 Normal Poses
10 Poses for the Staff

===== CLOTHING & HAIR MORPH LIST: =====

Vermillion Dawn
Ki’ara
Amazon
Fitness
Thin
Voluptuous
Breasts Size
Breasts Large
Breasts Natural
Breasts Implant
Elite Body Shapes
Stephanie Petite 4 Body Shapes (no proportional morphs)
Adjustment Morphs on all
Style Morphs on Hair, Bodice, Legs, Panty and Slave Chain
Movement Morphs on Hair, Bodice, Legs and Slave Chain

===== POSER INSTRUCTIONS: =====

..:: CHARACTER ::..
The character in this set is fully custom- meaning, you only need to own V4’s base to use it.

To load Ki’ara’s respective morphs, you must first load V4 into your scene. Make sure V4 is selected, then browse to your Pose Library, then into “Dark Apocalypse/Prisoner of War” and into the “Character & Poses” folder, and there you will see all the character options. Morph options are listed first, and these will load all morphs. Keep in mind, the head and body morphs both contain customized geometries. The deltas are included in the pack – do not delete them, as the morphs cannot work without them. The apply all skin option, loads all default mats (and this you will want to load first, before applying any of the other mats) You will also see a tattoo skin option (which will load a long and winding tattoo that covers her entire body) From there, you may choose the eyes you wish to use, as well as makeup options. The makeups are half natural, and half tattooed, to work with the tattooed skin. You must load the correct makeups to match which skin you chose, if you wish to match it (you can technically mix and match them, as they were done in such a way they are not reliant on one another)

..:: CLOTHING & HAIR::..
There is also a full outfit and hair included in the set. To locate these figures, you need to go to your figure library and find the Dark Apocalypse/Prisoner of War folder. In here, you will see two folders: Desert Punk Hair, and Desert Captive Clothing. To conform the clothing or hair, load the item, go to the top of poser under the drop down menus and click on Figure. A new menu will open which will say conform, click that and then conform to and a new dialog will open with its own dropdown. Select Victoria 4 and hit ok, and the item will load onto V4 (alternatively in DS, right click on the item and click “fit to” then select V4 in the list – but it should auto-conform in DS anyway) You will need to do this for all the figures. From there, you have a ton of morphs to play with, including adjustments which will fix pokethru, movement and style morphs on miscellaneous pieces, which will change how the figures look and move (note: dialing in morphs ALWAYS work best by dialing in on the BODY actor)

You will also notice there are 2 versions of each outfit piece, with the exception of the slave chain and hair – normal ones that you will have to dial in manually, and Super conforming versions that will automatically match whatever morphs you have dialed into V4. Keep in mind, to avoid pokethru, it is best to use the Magnetize clothing to V4 poses, which are included with V4 when you purchase her. The clothing has a myriad of standard DAZ morphs and adjustment morphs, so you can fit it to your own characters. Each item also has a special Ki’ara morph, so that it will fit to the character thats included perfectly (keep in mind, it is best to use this morph on the non-superconforming versions of the clothing, as it will not work properly with crosstalk enabling)

Also, Ive tossed in 3 full mats to change up the clothing. These will be located in the Pose library, in the folders Dark Apocalypse/Prisoner of War/Outfit & Staff MATS. You will also notice a ton of utility mats, which will turn off certain things in each piece of clothing. To turn it back on, just use any of the clothing mats included. Also note: The Dark Mistress velvet mats for the clothing requires EHSS in DAZ Studio to work (otherhwise, they will not render velvet)

The hair also includes mats, 14 in all (4 solids, 10 striped) You will find them in Pose:Dark Apocalypse:Prisoner Of War:Hair MATS.

..:: PROPS ::..
To locate the props, go to your props folder and find the Dark Apocalypse/Prisoner Of War Folder. There are two props in the set: Lynx Skull and Lynx Skull Staff (left and right hand parents) To load each, simply double click the icons. The Staff will parent to her hands, and it will also work with some of the poses included. It has many morphs on it, including movement morphs to blow the fur and feathers about, as well as gravity morphs to make it more realistic if you have it rotated horizontally.

There are also mats for the staff included, so it will match the 3 outfit mats inclded. These are located in your pose library (in the Outfit & Staff MATS folder) as well as your Materials library, in the Dark Apocalypse/Prisoner of War/Staff MATS folder. I have included both MC6 and PZ2 mats, simply because, PZ2’s don’t work with props and require an actor to be loaded in the scene (so if you are using the staff alone, you must use the MC6 mats)

The Lynx Skull, however, is not parented, as its intended to just be littered on the ground of your scene (or use on whatever you wish) It has morphs on it as well, some of which match the staff morphs, which will change the skull’s species.

..:: POSES ::..
There are also 20 poses included in this set, some of which were designed for use with the Staff thats included, and some that are natural. You can tell by the thumbnail which ones are intended for the staff (as well as which parents to load) as it will be labelled. To use, first load the prop, then use the pose for perfect alignment (otherwise, the pose will not pose the staff properly) To locate the poses for V4, you will need to go to your pose library, into the Dark Apocalypse/Prisoner Of War folder, and into “Character and Poses” – you will find them under the “P” divider, beneath the character options.

For a full instruction guide, Ive written a tutorial that has been included with the set in PDF format. This will explain everything in deep detail, and walk you through getting the best out of this set.

===== OTHER NOTES: =====
DS Optimized mats are included

A complete PDF Tutorial is included in the set. This will install to your Runtime folder, under Tutorial (VermillionDawn.PDF) It elaborates on instructions, and there are added tidbits you can read at your convenience. If you find yourself having any trouble, refer to this, as it covers literally any (normal) problem you’d encounter, and extra things you might not have considered.

Color coded and labeled templates for all figures and props are available, so you can make your own textures.

All conformers have blank channels (DAZ standardly named PBMCC and PBMDC), so you can make your own custom morphs and inject them simplistically.

The thumbnails for the files are the standard 91X91 resolution, so that they will show properly in DAZ Studio. If you are a poser 5 or higher user and prefer the larger thumbnails (which are 125×125 in size), you can download them here: Prisoner of War  Thumbs

Please Note:
Bigger thumbnails will NOT work in DAZ Studio, nor lower versions of Poser, so only download these if your using Poser 5 and higher.

Instructions to install larger thumbnails:
These are set up to the same exact locations as the original sets thumbnails. To install, simply unzip it to your Poser Runtime, and overwrite the old thumbnails. If you have moved your folders around, you will have to move these manually, too.

KNOWN ISSUES
Dialing in the movement morphs on the Legs Conformer and bending the feet of V4 may create unwanted results in some situations, as the foot bends further deform the movements, so adjustments may be needed. Unfortunately, it couldn’t be avoided, since the end of the legs where the morph movement occurs are so close to the feet, and I didn’t want to leave the movement morphs off completely.

When using the Utility MATS to turn off the legs/wrist wraps on the arms, you will need to use adjustment morphs to make the thigh/wrist straps tighter, to account for the missing cloth.

As covered in the instruction section, when using the conforming clothing in Poser, you may need to use the Magnetize clothing to V4 poses (which come with V4) so that absolutely no poke thru will occur.

There are no other known issues. See the PDF included for further details.

Technical Support is always available. If you have questions that need answers, feel free to email me — IgnisSerpentus@damageinc3d.net